Sunday, October 27, 2013

Paper Sewing

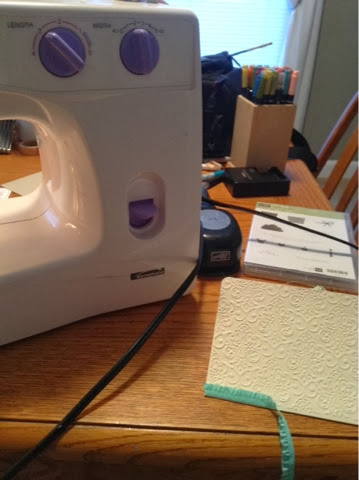
There's nothing I like more than sewing on my cards (and scrapbook pages, now that I think about it). It gives my projects a finished look that I absolutely love. As you can see, I don't have a top of the line sewing machine. It does two stitches - a straight stitch and a zig zag stitch. That's perfect for me because those are the only two stitches I would want to use. It's about 8 years old, I got it off of a Sears wholesale sale on Ebay way back then and I think I paid around $100 for it. Now I'm sure a similar machine would be cheaper. I don't clean it, I don't think I've done any maintenance to it, but it still works fantastically. Why? I think it's because I sew on paper, not fabric -- there's no lint to clean out or unclog from the machine. 
As I mentioned on my last blog post, I'm getting ready for a craft show and made a batch of sympathy cards this morning. I wanted to sew ribbon along the edge, but knew it wouldn't hold as well as I needed it to as I ran it through my machine so I just used a little adhesive to hold it in place before I ran it through. It will make the needle a little sticky but just clean it off after doing a few cards so your needle doesn't get too goopy. Regular adhesive works fine, but glue dots and sticky strip does NOT so be careful. I've sewed on many things in my day, it even will sew through Stampin' Up!'s window sheets.

And here's the final card! The Sympathy stamp is from the "Thanks for Caring" stamp set that is retired.. Usually I sell off all of my retired sets once they retire, because once something retires I can't demo it anymore. But I've kept this set because I love this "With Deepest Sympathy" stamp. And cards for a craft show seems like the perfect time to get some use out of it! 


Saturday, October 26, 2013

This & That Scrapbook Page - MDS

When I joined the My Digital Studio design team they asked each of us to create a page in MDS that reflects our personality. I knew immediately which kit I was going to use. The This & That Epic Day kit has Holly written all over it (well, not technically).

My personality is pretty girly, probably thanks to my two daughters, so I love all of the sweet colors in this kit, especially that beautiful pink! I love all of the pieces and parts in this kit, too. The little pink banners were so fun to string along the top and add some stitching to hold them there. The letters for "girls" was from the Epic Overlays kit.

I had my foot rebuilt in the beginning of June and haven't made a paper card since then. Well, that's going to end today. I signed up for a craft show at our school and hope to have lots of cards made to sell, so we'll see how that goes. I'll be sure to share some of them here on the blog when I get them done. I'm FINALLY looking forward to breaking out the cardstock and ink (and all of the other fun little doo-dads that go along with it). Yay for stamping!


Wednesday, October 23, 2013

MDS Blog Hop - Happy Page


Ooooh, I love black and white. Everything looks so classy in those two colors, doesn't it?

This week for the MDS Blog Hop we are showing what we've been working on. Recently I purchased the Eastern Elegance DSP download, not only because of the gorgeous designs but because I fell in love with this gray pattern and knew I wanted to use it for the family photos we've just had taken.

Here are the digital supplies used:

Background
     Eastern Elegance - 9
Embellishments
    Downtown Grunge - frame3
    Mis-Stitched - white 5
    Blossom Builders Kit - banner 1
    Staple & Stitching, Chocolate - Simple Stitches circle 4
Stamps
    Torn Edges - distressed scallop
    Yippee Skippee - you can never have too much happy
Punches
    Rounded Corner Punch (included in MDS)
Are you ready for the next project created by the always talented Jeanna? Just click on the 'next' link below to follow the hop and thanks for joining us!

Monday, October 21, 2013

An Announcement and an MDS Project!


I have an exciting announcement today!
I was asked by Stampin' Up! to be a part of the new My Digital Studio design team!  I'm sure you know how much I adore the MDS program, so this is quite an honor. They are revealing two design team members every other day on the MDS blog here - and my reveal day is today (along with my sweet and talented friend Amber). They asked each team member to create a page that reflects their personality so you'll see that on the MDS blog as well. I can't wait for you to meet each of the new DT members -- they are AMAZING (and I bet you'll see a few familiar faces on it, too!) so be sure to check the blog each day!

I also have a quick, fun little MDS project to share with you today.
I don't get a chance to do it very often, but I love leaving quick little notes in my girls lunchboxes. When I saw the Do Your Best kit, I knew it would be perfect for my little lunch notes to them. I just took the pre-designed notes, added the pictures, recolored the arrow element, added a new stamp from the Seriously Awesome set to the "Love You" card and printed them. I even added a few jewel accents to Audrey's once it was printed. Just a few minutes used for what I hope will bring a few smiles to my little ladies when they open their lunchboxes this week!


Wednesday, October 9, 2013

MDS Blog Hop - Christmas Banner Bags


WELCOME TO THE "NEW" MDS BLOG HOP!

A bunch of us have joined together over the past two years to share our passion for digital designing with Stampin' UP's My Digital Studio. We have new designers that have joined us - WELCOME CORI, JULIE B. and ELIZABETH RUSH!  There are now 10 of us on the team!  These ladies are ridiculously talented in MDS and I'm so excited to be on this Blog Hop with them! You will find us blog hopping on the 2nd and 4th THURSDAYS of each month! We will have a "theme" selected on the first hop and then a "What we are doing in MDS" on the second hop. Also new, is the hopping method. Just click on the NEXT button and it will take you to the next person on the hop. We hope this inspires you to get into My Digital Studio and start creating! Would love to hear what you think of our "new" hop and projects, so please take a moment to let us know in comments.

Our blog hop challenge for today was to make a project for the upcoming holidays. I chose the Christmas holiday (Umm...hello...my name is Holly, right?) ;) Let me start by saying that even though my name is Holly and share the name of the bush and berry, I am SO not a fan of the traditional Christmas colors of red and green. Give me blue, give me pink, you can even mix some green in there and I'd be OK with it but not red and green together. I think I'm burnt out. So when I saw the Christmas Banner Simply Created kit I fell in love.

I used the rosettes and stacked them on top of each other (making the top one a bit smaller). And that cute little kraft colored tag? It's from the Neon Notes kit! And the Merry Christmas stamp is from the All Holidays stamp set. I printed them out, cut them out, attached them to the front of the bags with stampin' dimensionals and added a non-digital Frosted Finishes Embellishment and it's ready to hold a cute little Christmas gift! I'm thinking I'm going to use these for my teacher gifts this year.
Are you ready for the next holiday project created with MDS? Just click on the 'next' link below to follow the hop and thanks for joining us!

Saturday, October 5, 2013

Celebrating World Card Making Day - MDS Style!

Happy World Card Making Day!
This is a super-quick card I made to celebrate today.

Have you seen the new postcard printing options yet for My Digital Studio? I am completely in love with this one - it's the Artisan shape.

I used one of my favorite kits (Hello There) to create a card in the new shape. As a teacher, I am ALWAYS in need of Thank You cards especially around the holidays so I'll be getting these printed ASAP. And the postcard will be fantastic because I'll just be able to hand write my note to the recipient on the backside.

To create a postcard using the new Artisan shape or the also new Scalloped shape just open My Digital Studio (you may need to check for an update if you haven't in the past week) and create a blank 5"x7" postcard then go to:

VIEW MENU --> BLEED AREA --> ARTISAN SHAPED POSTCARD

That will give you the shape guides so when you design your postcard you will see the highlighted area for your shape. Don't put anything important in the gray area, or it will be cut off when the card is printed.

Have a wonderful weekend and enjoy what's left of World Card Making Day!


Thursday, August 29, 2013

MDS Blog Hop - Pool Fun

My girls had SO MUCH FUN in the pool this summer and even though I wasn't able to walk, my sister-in-law Shannon was sweet enough to go out and take some fabulous photos for me!

This picture of Audrey in the inter-tube was my favorite. :) To make this page I used a variety of different fonts for the title and the arrows are from the "This and That" digital kit.

I'm sad to tell you that this will be my last MDS blog hop post (at least in the near future). I have some health issues that I need to work through and recover from so I'm trying to get life responsibilities down to a minimum so I can do that. I hope to be back as soon as I get things sorted out!

The ladies in this blog hop have been nothing short of the sisters I never had but always wanted. I love each and every one of them... and the talent! They are all so talented! :)

So with that, be sure to visit the other ladies and see what they came up with in MDS this week and know that I'll miss sharing with you! Thanks so much for stopping by each hop!


Thursday, August 15, 2013

MDS BLog Hop - Nook Inventory Sheets

If I've not mentioned it before, one of my jobs is a librarian at a small, private school for kids from pre-school to 8th grade. I love books so much, so this is really the perfect job for me! Last year I was able to purchase some Nook devices for the older kids to use but needed a good way to list what books were on the devices. Enter MDS!

I just saved the book cover images of each book and imported them into the program. Really fast and easy! Now I'll just print them out and slip them in the cases pocket.

We have two new hoppers! Be sure to check them out when you visit the other blogs on the hop! :)


Wednesday, July 24, 2013

MDS Blog Hop - Using Stamps in Other Programs

Welcome to another "What we're working on" MDS Blog Hop day! I haven't been working on a whole lot lately. I finally got my foot cast removed yesterday and am having an "interesting" time trying to walk on it again. And by interesting, I mean not-very-fun-at-all.

BUT I've been trying to keep the girls Project Life albums caught up since that's pretty simple, for me just uploading photos to Sam's Club. But sometimes I like to add a little something to take up some empty space. Like this picture of the girls and Grandpa in the pool.

It's super-simple in MDS, but what about other programs? I did this one quickly in Photoshop! Three years ago I posted a tutorial video on how to do this using MDS elements, here is the link again if you aren't sure how to accomplish this!

This uses the brand new Rise and Shine kit which I LOVE (very Project Life-y!). I will be using this one LOTS!

Don't forget to visit the other talented ladies on the hop to see what they're working on lately -- and we have a new hopper, the very talented Julie Davidse! :)