Showing posts with label Scrapbook Pages. Show all posts

Thursday, July 10, 2014

MDS Blog Hop - Looking for Sea Glass

Yay! It's that time again - time for the My Digital Studio blog hop where our theme for this week is "Summer Fun".

I've been on a simple kick lately. And I'm a firm believer that when you love your pictures you don't need a whole lot of "stuff" to overshadow them.

So here's my simple page of our day of summer fun. The only thing I used in MDS is a strip of cardstock and a font (Century Gothic).

Thanks so much for stopping by!
Time to visit the next blog on the hop where I'm sure Jeanna has something amazing to share with you!


Thursday, June 12, 2014

MDS Blog Hop - Dad Selfie

I love my dad!
He's always doing something funny or goofy to make me laugh. We had a birthday party for my youngest daughter last weekend and when I put my camera card in my computer to download the photos from the party, this selfie was on it. Of my dad! Hilarious! He didn't know he was giving me ammunition for my MDS Blog Hop Father's Day page! (thanks, Dad!)

This is such a super fast page, here are the few supplies you'll need:

Background Paper
Downtown Grunge

Embellishments
This & That Retro Fresh
Staple & Stitching
Gold Sequins

Be sure to keep following the hop, next you'll see what project the fabulous Jeanna has in store for you! Just click the 'next' button below!


Thursday, May 8, 2014

MDS Blog Hop : *heart* This Page w/ Project Life

Welcome back to another week of the My Digital Studio blog hop where we share some fun digital projects. This week we're working on projects about Mothers. This theme is near and dear to my heart for two huge reasons. There is no doubt in my mind that God put me on this Earth to be a Mother to these two amazing little girls. I take this job very seriously and hope I'm doing alright with it. They (and their daddy) are definitely the loves of my life.

I'm LOVING playing with the new digital versions on the Project Life Everyday Adventure kit from Stampin' Up! and wanted to try the cards in a non-pocket page way. The hexagons at the bottom and the top of the picture are just the 2x3 cards blown up big and turned on their sides.

This was a super-fast and easy page to make, just add a few cards, some stitching and the heart this stamp.

Be sure to keep following the hop, next you'll see what project the fabulous Jeanna has in store for you! Just click the 'next' button below!


Friday, May 2, 2014

Super-Easy Digital Handwriting

I've had a few people ask me lately how I added my signature to my watermark and to my blog posts. Technically I use a digital drawing pad instead of a mouse with my laptop and that's how I made it. BUT since then I've found a super quick and easy way for you to make your own which doesn't involve you spending $100 on a drawing pad. In fact, it won't cost you anything if you have a tablet.

If you have an iPad, I use an app called "Paper" by FiftyThree . It lets you draw with your fingertips (not your nail - don't want to scratch that screen!). Here's the fun part. The more pressure you put on the screen with your finger, the thicker your line will be. The less pressure, the thinner. And it's so easy to use! It gives you different "albums" to use and there are many pages in each to play around with. Don't like what you made? Use the eraser tool to erase it! There are many colors, too. As you can see, I used it to write the word 'Love' for the card in my daughter's album. Once you have the app there are other more complex tools you can order but I've been using for a while and I've never had to purchase anything.

See that little box with an arrow button in the middle of the X and the + at the bottom of the screen? That's the button you press to share your creation when you get it just how you want it. That share button will let you email it to yourself. With this one I just emailed it to myself then uploaded it to my favorite photo processor.

Now I have a neuromuscular disease that makes my fingers and hands tremble so normally my handwriting isn't the best. It's kind of shaky and not very smooth. But see the 'Love'? I did that! Even with my shaky fingers! It takes whatever you write and makes it SMOOTH. Awesome, right?

But what if you have an Android tablet? Unfortunately, Paper by 53 isn't available for Android, however I have heard of a similar app called Bamboo Paper that IS available for free in the Play store and iTunes. I tested this app out, too and it works a LOT like Paper by 53. Only this one lets you pick your pen size and has more colors available (and cuter ones!). But as far as writing goes, I found the Paper by 53 App slightly easier to get the look I wanted. Either way - there are two fabulous free options that will let you get your own handwriting digitally into your scrapbooks or on your blog!

I've had a few people ask -- the Project Life card used on my page above is from the Stampin' Up! Everyday Adventure kit and you can get one by clicking here. Just go to PRODUCTS at the top, then SHOP NOW and all of the Project Life items are on the left side. :)

Hope you have fun!


Saturday, April 26, 2014

Audrey Title Page - Project Life by Stampin' Up!

I've mentioned in previous posts that in 2013 I did a Project Life album for each of my girls and took a photo every day. I'm almost finished with the albums (all of the photos are in there, I just have to finish my journaling). But one thing I didn't have finished was the title pages. For some reason I was having a complete mental block on how to do them. I had photos of her in each season which didn't all match and that was making it harder for me to come up with something.

When my Everyday Adventure kit from Project Life by Stampin' Up! came this week, I knew I had the perfect design for my title pages - FINALLY! The colors were broad enough that it took the various colors of all of my photos and tied them all together. Yay! Here's what my final title page for Audrey's page looks like. And I was SO happy - the Day to Day stamp set had all of the season names that I needed to go with my pictures.

If you're wondering about the title card with her name and the date, I created them in My Digital Studio and did an earlier blog post about those here.

If you are new to Project Life and pocket scrapbooking, and are wondering about the size of a yearly album like I did you can see how thick my finished 365 day album is in the photo on the right. And the best thing is that the album closes flat with even a little room to spare for embellishments (I didn't use many in this album).

Don't forget - Thursday is the day to order the first batch of Project Life by Stampin' Up! goodies, so be sure to check back here on Thursday, May 1st for ordering details!

Project Life by Stampin' Up!


My Project Life by Stampin' Up! arrived a few days ago and Stampin' Up! relaxed their policy on when we can show items in pre-order so I thought I'd take some photos of what they look like and give you all a little sneak peek today!

If you are already a Stampin' Up! demo you can pre-order the goodies NOW, or if you're not a demo you can sign up as one (contact your current SU! demo for more information - or if you don't have one yet, feel free to ask me any questions you may have by emailing me at holly@hollystamps.com) OR you can begin ordering your very own kit as a customer through any Stampin' Up! demonstrator on Thursday, MAY 1st!

I have lots of photos here, if you want to see one bigger, just click on it! :)

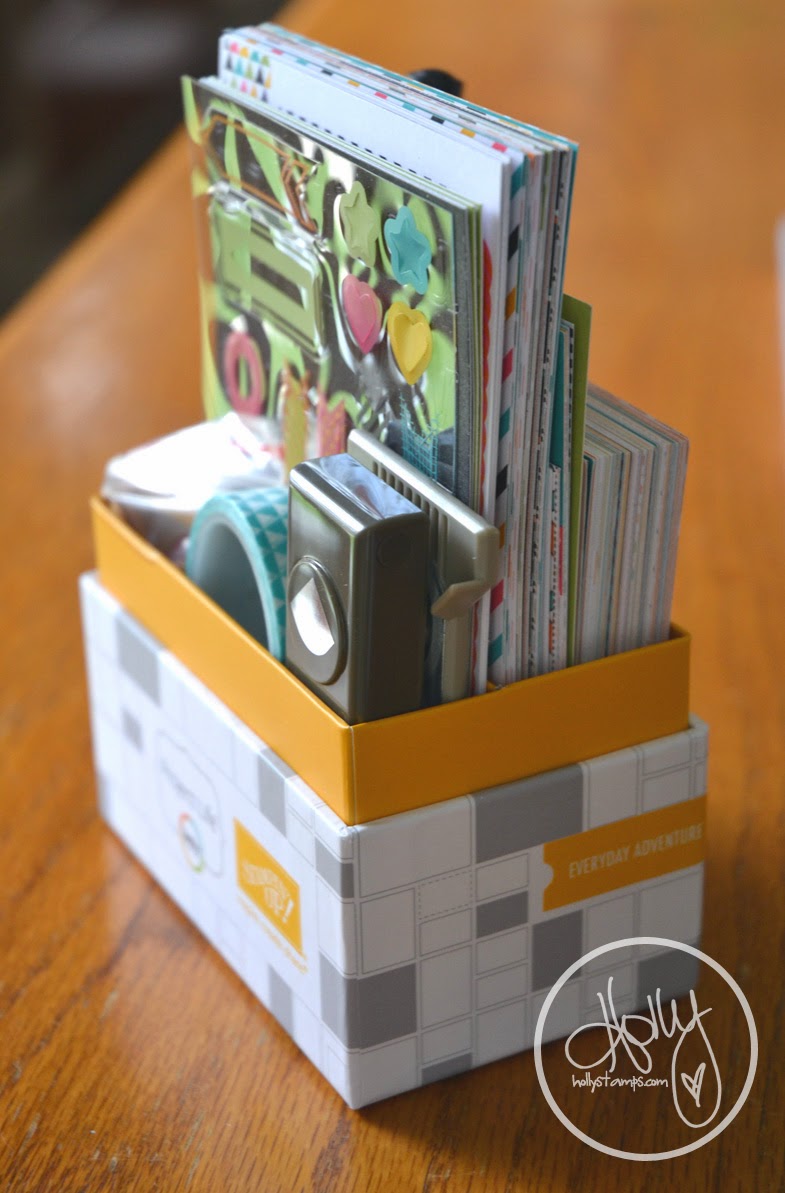
First, let me just tell you that while I adore everything this kit came with, I LOVE the little box it comes in! It will hold your entire kit, accessories, pens, photos, etc. in one little box right there! As someone who does a lot of my scrapbooking at crops where I travel, this will come in SO handy! I can plan out each page and keep them in the box.

Next I ordered the accessory pack but had no idea what was inside. First, there are these super-cute little sticker letters in both black and green. Sticker alpha's are my favorite so I was VERY excited to see these!

 Next there were 4 different die-cut 3" x 4" cards! They are all cute, but this one is my favorite.
You also get a sheet of these cute little clear plastic accessories. LOVE the banners and arrows!
Cardstock stickers! Four sheets of them.
I can't wait to use these!
Then there are wood cuts and arrow clips. How cute are these?
Here's a picture of the entire accessory pack. Notice there is also a roll of washi tape (in my favorite color!) AND cute circle puffy stickers! My love of puffy stickers dates back to the 80's, but I digress...
And here's the backside of the Everyday Adventures box with the core kit, the accessory pack goodies, my pens AND the corner rounder - they all fit so nicely!

And see that little yellow label around the side of the box? It comes as a sheet of stickers (in many languages) that allow you to put on your box to keep them all straight. This kit is SO cute, I can't wait to see what other Project Life kits will be available in the new catalog! If you want a catalog, feel free to contact me for one when they come out!


This first stamp set is the "Day to Day" Project Life stamp set. It's much bigger than I thought it would be. I laid them out on an 8 1/2" x 11" piece of cardstock so you could see how big they actually are. As a daily/weekly PL'er I'm in LOVE with this set.

This Project Life stamp set is the "Point & Click" set. I love all of the elements and it looks like some of the labels coordinate with the Framelit dies. Yippee!


Wednesday, April 23, 2014

Project Life by Stampin' Up! - Splash Harbor Page

YAY!
My Project Life by Stampin' Up! pre-order arrived today via the big brown truck and I couldn't wait to play. Here's just a little sneak peek of a page I did with the products.

I had these great spring break photos that I've been excited to scrapbook and the colors were perfect for the Everyday Adventure kit that arrived today.

I have to say - I LOVE the new 4" x 4" pockets. They're such a fun size to use.

Even though the new Stampin' Up! annual catalog comes out June 1st, you'll be able to order this Project Life kit and its goodies on May 1st! I'll post order links on the blog on that day!


Friday, April 18, 2014

My Favorite Current Stampin' Up! Products for Project Life

If you've been regular reader of my blog then you know I've been using Project Life for the past two years to do my scrapbooking. So you can imagine how excited I was to hear that Stampin' Up! would have exclusive Project Life products coming out soon.

Since the products haven't been released yet, I thought I'd share some of my favorite current Stampin' Up! products that I love using in my Project Life albums. These are products that you can get your hands on right now! (and a few of them are from the Occasions mini catalog that is only available for one more month)

Last year I did a daily Project Life album for each of my girls. While I loved it, it took a LOT of work and time. So this year I thought I'd do a weekly album for each of them.

Here are a few cards from my first week of 2014. Can you tell we had a ton of snow? I love the Retro Fresh washi tape (Occasions mini catalog) from the This and That line. I also used the This and That Rotary Date Stamp on my Week 1 title card.

Stampin' Up! has so many fantastic stamp sets that also work well with scrapbooking. One of my new favorites is the Just Sayin' set (Occasions mini catalog) with some adorable speech bubbles that make fun captions on your photos. I popped the "woo hoo!" bubble up with a dimensional to give it a little more dimension. For my "Week 1" card I used both the Notable Alphabet (week) and the Memorable Moments (1) sets. With two girls I don't have a lot of pages without bling so I added a strip from the Basic rhinestones.

What I love most about Project Life is that it allows you to make fast and simple pages, but they still are so fun to create and don't take a ton of time to do it.

Thursday, March 27, 2014

MDS Blog Hop - Miss You Already Page

Thanks for joining me for the blog hop this week! I'm sorry, this is going to be a short post for me today.

This week one of the most amazing women I've ever known, my Aunt Joan, passed away. To say I'm heartbroken would be an understatement. She meant so much to me and I'll miss her so much. I already do. She always knew what to do and say and always had a smile on her face even when her health wasn't the best. I am so blessed to have had her in my life.

So my quick page using the Blossoms Abound kit is of my Aunt Joan with her nieces and nephews a few Easters ago. She loved us all so much and we loved her right back.

Now hop on over to Jeanna's blog to see what she's been working on this week - just click the next button below!


Thursday, March 13, 2014

MDS Blog Hop - Hybrid Scrapbook Page

If you are following the My Digital Studio blog hop thank you for hopping through to my blog!

Today's challenge was for us to use our e-cutters or create a hybrid project. And since I don't have an e-cutter, I have a hybrid scrapbook page to share with you today.

I posted the original MDS page that I started with here two years ago as one of my hop pages and this winter I finally had it printed as a 12" x 12" page. Now I love how simple the original was, but it wouldn't be a hybrid page if I didn't add something to it!

I decided to make my own banners using the "I am..." stamp set that I received at the Stampin' Up!'s convention two summers ago. I love this set, but had never used it. It was about time! I stamped the words in Versamark and heat embossed them with black powder. Then I bordered the banners with a black Stampin' Write marker and cut them out.

I added them to the page with two stacked Dimensionals in the middle to give the banners some dimension.
After I added the banners I added some small punched Basic Black flowers scattered around the page.

Once I added those I got out my sewing machine and sewed around my page with white thread and a straight stitch. There wasn't any kind of order to where I sewed it, I just didn't want to stitch over Audrey and I wanted to make sure to sew the ends of each banner down.
After that I added all of the rhinestones and the page was done!

Thanks for joining me for the blog hop today! I haven't forgotten about the 40 days of cards - I'll have another one posted later tonight.

Now head on over to my buddy Jeanna's blog for her take on the challenge! I'm so excited to see what she's done this week. :)

Thursday, February 13, 2014

MDS Blog Hop - Valentines!

Happy Thursday and thanks for following the MDS Blog Hop from Elizabeth's blog!

As you may already know, today we were challenged to create something having to do with Valentines or love, etc. I *love* these photos I took last weekend of my girls and their friend, so I knew I had to use them this week.

I don't know if you feel the same way, but sometimes I just want to create a page without re-inventing the wheel. Sometimes a completely blank 12x12 page is SO INTIMIDATING! For today I decided to try a template and I'm so happy I did because I love how it turned out.

I started with the A Split Second designer series templates and used the first page. Then I added some sequins, some rhinestones and some stitching and a whole lot of fun elements from one of my favorite kits - the Hello There kit.


Thanks so much for stopping by my blog today! Now it's time to turn you over to Jeanna who is sure to have something amazing to show you, just click the "Next" button below!


Tuesday, January 28, 2014

{love} MDS style

The last few days I was working on a page for an upcoming MDS blog post and came across this photo of my oldest. While I didn't use it for the page I was working on, I knew I wanted to use it for something.

For this page I started with the photo blown up to cover the page, then set the opacity lower (35%). I loved the muted color of it, but felt her face didn't stand out as much as I wanted it to so I used a heart punch, filled it with the same photo and sized it as big as the page, making sure it layered over my background photo exactly. To complete the edge I added 105 gold sequins. Yep, thanks to the layers in MDS I could see that there were 105 of them.

All of the "Love"s in the background are stamps - I used the MDS search feature and did a search for love. You'd be surprised how many you will find if you search for them! A few of the I had to crop out the word, but you get the idea. I changed them to white then sent them to the back of my page UNDER my background photo at 35% opacity. That's why you can still see the original image through the stamped words. Sorry, no supply list today - with all of those stamps it would be endless!

DON'T FORGET - It's Tuesday, Stampin' Up! has new downloads for MDS today! Click here!

We've been snowed in but are hoping we may be able to get back to school tomorrow - keep your fingers crossed for us - this mom is starting to go crazy! I would never survive as a homeschooling mom, that's for sure. I told my oldest that and she said "I would NEVER want to be homeschooled - you crack the whip with this school work stuff!"


Friday, January 24, 2014

Doodling on Photos with the Stampin' Chalk Marker

Ooooh, do I LOVE to doodle in my scrapbooks! Stampin' Up!'s white signo pen works great on photos, but writes a pretty thin line. Great for detail, but not so great for a big statement. And sometimes I'm a big statement kind of girl.

When I first saw the new 2014 Occasions catalog (need one? Let me know!), I knew the new White Stampin' Chalk Marker had to be mine and today I had a chance to experiment! As you can tell by the photo -->
I had a little too much fun with it! If it writes this well on photos, I can't wait to see what else it looks great on! People around here better hide their stuff if they don't want it doodled on!

Thursday, January 23, 2014

MDS Blog Hop - Happy Birthday To You

It's MDS Blog Hop time again!

If you've been hopping along, you've just come from Elizabeth's blog and her fun project!

This is the week where we share what we've been working on and for me that's birthday pages! My oldest turned 11 this week (how is that possible?)

Have you seen all of the Retro Fresh kit downloads they've been releasing in the weekly downloads lately? Well, it's safe to say I'm in love with them!

On this quick page I used the Retro Fresh Pocket Cards, Retro Fresh Embellishments, and the Retro Fresh Washi Tape.

Now you get to hop along to Jeanna's Stamp Time Somewhere blog where I'm sure she'll show you an amazing project - just click the "next" image below!


Monday, January 20, 2014

Today Remember This : MDS Page

We have the day off today (work & school) but I have 2,000 book words to write so I'm just posting a quick MDS page today.

If this looks familiar, it's because it was on the My Digital Studio blog about a month ago but I love this page so much I wanted to share it here, too.

Doesn't that little face make you smile? She got kicked in the face by a cleat-wearing Kindergartener at recess and ended up with some nasty scabs to prove it.

Have you tried the MDS class kits yet? If not, you should - they are fabulous! I use MDS almost every day and I learned SO MUCH from watching the class videos! Lots of great short-cuts and techniques. Plus you get a kit of goodies to use to try it out! This page used the "Love This" class kit (with the addition of a Downtown Grunge frame, of course).

Hope you have a wonderful Monday!

Wednesday, January 15, 2014

Hello Glitter : SCIC #75 Sketch Challenge

I was so honored when I was asked to participate in the Stampin' Celebration monthly sketch challenge! The sketch was super-fun with lots of layers.

I started with a white background because for some reason I can't get enough of white backgrounds lately... maybe I like the simplicity? Don't know. But I love them!

I made my letters with MDS alphabet punches and filled them in with the gold glitter paper. The funny thing is, I used to HATE gold. But I have to admit, it's growing on me. Once I filled the letters in with the glitter paper I matted them with Soft Suede so they would stand out a little more and added a little shadow.

Here is the supply list of what I used for this page.

Staple & Stitching
Sara's Sequins
Chevron Ribbon
Love This Kit (hello stamp)
Torn Edges  
Timeless Type Junior Letter Punches
Gold & Silver Glimmer Paper
Whisper White & Soft Suede cardstock

Thanks SO much to the Stampin' Celebration design team for asking me to participate this week!