Friday, August 31, 2012

MDS Blog Hop - Favorite Downloads

Jeanna challenged us this week to create something using our favorite downloads. How fun!

Today we're finishing our second week of school and I have a little one home sick already (ugh!) so it's been that kind of week for me. For the past three years I've been the Art teacher and the Librarian at school, but this year I'm also teaching the computer classes. I have a Computer Science degree so naturally I wanted to do it, but it's a lot more on my already full plate. It felt so nice to get on MDS last night and have a little "me creative time"! I was going through withdrawal!

Now, I adore black and white. It's so classy and gorgeous. And when I saw the new Essentials Designer Series paper download that was all black and white papers - I couldn't download it fast enough. Yep, it's my new favorite. :) And could the background paper match her shirt any better? Wowzers!!! If you look closely at the large photo of Audrey you'll see that it has a very light overlay over it. I love that it adds a little texture to it. Just put a stamp over your photo and bump the Opacity setting down really low. I think this one was set at 15. If you click on the image above you'll be able to see it better. I also cropped the stamp so it was the same size as the large photo.

Did you know that you can create supply lists SO easy in MDS2? It's such a cool feature! In the right menu just click on "Check Project", then hit the "Supply List" button and it will list everything out for you (like below!) I'm adding the links to the products I used there so if you find any you can't live without either, you'll have easy access. :)

Thanks so much for stopping by today and don't forget to follow the hop with links under the supply list - I'm sure the other girls have some amazing eye candy waiting for you today and I can't wait to see what everyone's favorites are!

Supply List:

Background
Embellishments
Stamps
Paper
Continue hopping with the links below!

Sunday, August 26, 2012

How-to Video - Stampin' Up! Fabric Flowers

I think I may have been one of the last demo's to hop on the fabric bandwagon. Funny, since I love to sew. But I love to sew on PAPER. Not fabric. And since all of the patterns on Stampin' Up's fabric is also on their paper, I thought "Well, wouldn't that just be silly to have the paper AND the fabric?"

Thank goodness I've come to my senses. You can quote me on this, "I CAN'T GET ENOUGH OF THE FABRIC." So much that it scares me just a little. I've been playing with it all so much that I created a little video for you showing how I made this fun little fabric flower with only four "ingredients".


If you haven't tried the Designer Fabric yet, now would be a great time to play around with it and see what fun things YOU can come up with!

PS - I apologize for the sometimes shakiness of the video, it was filmed by Audrey who only did it if I made a deal with her to show her how to use my sewing machine when she was finished. (and a sewing monster was born!)


Friday, August 24, 2012

MDS Blog Hop - Postcards!


It's Friday, it's Friday! And you know what time day it is - My Digital Studio blog hop day!

This week I challenged the talented MDS blog hop crew to create a postcard. It could be any theme, etc. the only requirement that it just be a postcard.

I've been wanting to design a digital "Thank You" postcard to give out to my customers for years now, and just never got around to doing it. Well, thanks to the MDS challenge I finally did.

For this card I used my favorite kit, the Spring Break II kit for my embellishments and background papers. Then I used the First Edition kit and the Staples and Stitching kit, and on the back the little "Made just for you" stamp is from the Creatively Yours digital stamp set. And now that all of our printed digital items are 31% off until September 14th, I'm excited to finally get these printed! At that price, it's silly not to!

Now I'm off to check out the other MDS blog hoppers and I can't wait to see what postcards they've come up with! I'm sure you'll want to check them out too, don't forget to click on the names/links below to see more digital inspiration in postcard form!

Wednesday, August 22, 2012

Stippled Blossoms Love!

I looked at the Stippled Blossoms stamp set in the catalog and thought "Eh..." and I'm a HUGE lover of flower stamp sets. So I didn't buy it. Then I went to convention where they used it in one of my classes and

BAM!

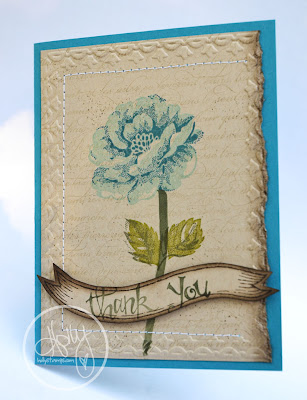
I fell in love. Hard. When I got home, I had to get it. Immediately. And I love, love, love it. Can't stop using it! We did this card for a workshop a few weeks ago. The background uses the En Francias background stamp, and the banner is from another new favorite set of mine, the Decorate A Daisy stamp set.

I embossed a little, inked a little, and sewed a little. I used Island Indigo and Pool Party for the flower, and Old Olive and Always Artichoke for the leaves, stem and greeting, and Crumb Cake for the cardstock and the background stamp ink. Oh, and I dimensional'd the "Thank You" banner.

Thanks so much for stopping by and taking a look today! I've been off the blogging grid for a few days, I started back to school Monday and the kids started today so I've been knee (OK, neck!) deep in school paperwork, organizing, lesson plans, etc. It's been fun but I can't wait for the weekend! :)

Sunday, August 19, 2012

So You Want To Take Your Own Photos?

Let me preface this post with the disclaimer that I am not, nor do I think I am a professional photographer. I'm just a mom who likes to take pictures of her kids. I've picked up/figured out a few techniques and tips along the way so I thought I'd share them on my blog today. (Don't worry, tomorrow I'll be back with something crafty!)

I took the girls out for a shoot this morning so I'd have some examples. We have an amazing place here called Kingwood Center. It has amazing grounds and beautiful gardens - perfect for taking photos. Which leads me to my first point.

Location.
You may not have a Kingwood Center near you, and that's OK. Beautiful nature surrounds you, you just have to look for it. My cousin, Megan Dill took these AMAZING photos of my cousin Kim and her family in their parents' backyard. Last year I took the girls downtown where there are brick streets and parking lots. Even with my photo of Audrey here, just a tree makes great scenery. And don't forget to keep your eye on the background behind your subject. It's much easier to move your subject if the background doesn't look good, than to try to take it out after the picture has been taken.

Lighting.
When taking outdoor shots I try to either do them before noon or in the evening when the sun is setting. When noon hits and the sun is directly overhead it makes harsh shadows (yuck!) and it will make your subject squint (also yuck!).

Get them comfortable.
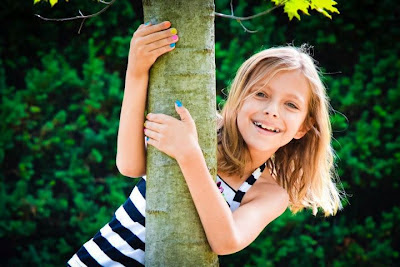
I've heard mom's yell at their kids when they don't smile for the camera and I'm pretty sure yelling at them is not going to fix the problem. I don't know about you, but my kids aren't big advocates of doing what I tell them to do. So when we go out for a shoot I encourage them to make goofy faces. It gets them comfortable with the camera and with me snapping pictures behind it. It also helps to have a camera with a fast shutter speed so once you get that goofy picture, you can get the one a second or two later when they're laughing about it. Who doesn't love a picture of a kid laughing? And you know what? I LOVE the goofy pictures too. Isn't Natalie going to love us when her dad and I show her boyfriend this picture when she's in high school?

It's OK to be serious.
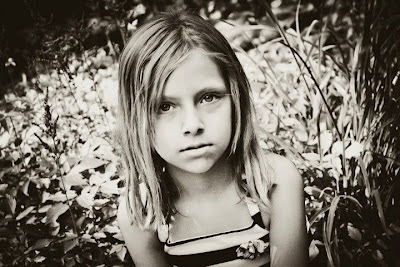
While we're talking about facial expressions, let's talk about smiling. Or better yet, let's talk about not smiling. It's natural to see a camera and want to smile. I think it's embedded in our brains from when we're little that when you see a camera, you smile. But when I see my kids day in and day out, I see them smile maybe 10% - 20% of the day? When I'm 90 and look through my photo albums I also want to remember what they look like without their mouths stretched out to their ears. I love the simplicity of normal. So when I'm taking photos I often tell my kids not to smile so I can remember what their normal looked like someday.


Don't look at me. Look at anything BUT me.
Your kids may think you're crazy when you tell them NOT to look at the camera, but sometimes you can get the best shots that way. For the same reason as above, I love shots like these. I want to remember them this way. Don't get me wrong, I get LOTS of smile photos. During a normal shoot I take between 200-300 photos. Normally 10-20 are keepers (if I'm lucky, a few more than that). But those shots I do get are SO worth it.

Get close.
My camera zoom is my best friend. How else would I be able to see all of those missing teeth of hers? Or the front tooth that just started coming in? The beauty is in the details and it's so much easier to see them when you get close to your subject. And the closer you get, the less you have to worry about your background, because there's less room for it to show.

Move the camera.
Don't be afraid to tilt your camera and get a whole different look to your photo. Straight is completely over-rated. :) Trees may grow straight most of the time in real life, but with a camera you have the ability to do whatever you want to with that straight tree (and the kid leaning against it). I think it all comes down to this - don't be afraid to try different things. Experiment! See what works best for you and what gets you the best photos. Photos that YOU like and will treasure for the rest of your life.

One final note is that you don't have to have a big, fancy SLR camera to take great pictures. Sure, it helps, but I can get fantastic photos with my $99 point and shoot Kodak camera too - it's all in how you frame the photo and what you make of it. To process my digital photos I use Adobe Lightroom and a whole bunch of free presets that come with the program and that I downloaded from the internet. It's a fun program to play with and adds so much to your photos. I'm sure you'll be seeing more from the shoot today in my My Digital Studio projects in the future - so beware! :)


Saturday, August 18, 2012

2012 Artisan Finalist Blog Hop - Day 10

I can't believe this day is here already. :( The last day of the Artisan Finalist blog hop. It's been so fun posting these projects everyday and I hope you've enjoyed seeing them! Did you just come from Connie's blog? Wasn't her last project yummy?

Well, for the last card I have to show you from my entry I stayed true to my My Digital Studio heart. This card is completely digital and I did a square card because I love being different! On this one I also designed the inside of the card which made it extra fun, I think.

Well, I'm off to my 20-year class reunion tonight and plan to have a really fun time. And the blog hop may be over but I still have PLENTY of projects I've hoarded to share with you next week so come back!

Now off you go to Melissa Stout's blog where I'm sure you will find an absolutely amazing project waiting for you! Thanks so much for visiting this week and if you want to continue on with the hop and forgot where you were, here's the road map!


1. Connie Collins
2. Holly VanDyne (you are here!)
3. Melissa Stout
4. Amy O'Neill
5. Sandie Connor
6. Amy Rogers
7. Mercedes Weber
8. Tara (Murphy) Bourgoin
9. Mindy Bingamon


Friday, August 17, 2012

2012 Artisan Finalist Blog Hop - Day 9

Day 9?????? How on earth can it be Day 9 already? Today we have our second to last Artisan finalist project to show you. Did you get to see Connie's? Wasn't it so gorgeous? I can't wait to go back through this hop when it's all over and just drool at them all.

OK, so here it is. The window card. I LOVE LOVE LOVE LOVE LOVE Stampin' Up!'s window sheets. Always have, always will. There is just so much you can do with them! So this time I cut a sheet the size of my card front and embossed it with a folder and my Sizzix. Yep, you can totally do that (and it looks cool too!) Then, I cut the Top Note shape from the front of my Basic Gray card and sewed the window sheet onto the back of it. Zig-zag stitch all around the edges. In white. Kind of striking, huh? But before I stitched I added my punched hearts so I could "sew" them into the border.

Then I built the inside of the card starting with the Basic Black background. Then a Label from the Framelits. I doodled the border on it with a black Stampin' Write marker, stamped the Congratulations greeting in the middle and stamped and punched my pink "Love" heart. Then on the front of the window I gathered some white satin ribbon (just put a little snail in a line to get it to stick) and sewed that on with a straight stitch. The fun thing is that it covers up the inside of the card where you would sign your name. So a fun little surprise until they open it - they don't know how it's from! (OK, so maybe that is kind of like every other card...) :)

So that's it for me today! Thanks so much for stopping by and time to continue on with the hop! I'm sure  Melissa Stout  has something amazing to show you today!


1. Connie Collins
2. Holly VanDyne (you are here!)
3. Melissa Stout
4. Amy O'Neill
5. Sandie Connor
6. Amy Rogers
7. Mercedes Weber
8. Tara (Murphy) Bourgoin
9. Mindy Bingamon

MDS Blog Hop - Summer Fun!

Heather's theme for this week was Summer Fun! For me this summer, summer fun has meant helping plan our 20-year high school class reunion (UGH, did I just reveal my age?) I said I'd do the name badges, and of course I did them with MDS2.

Our mascot was the "Tygers" (yes, it had a Y, no typo there!) and our colors were brown and orange so I started out with a little Crumb Cake paper from the Downtown Grunge kit. I added a simple, small orange ribbon across the bottom then imported the tyger paw .PNG file with the background stripped out. I added their yearbook photo, then their name in Chocolate Chip. Because of the size I did three to an 8-1/2" x 11" sheet, printed them, trimmed them and laminated them. I'm still going to punch a hole in the top with my Crop-a-dile and add a lanyard to it, just haven't gotten that far. I did on mine though to test it out - would you like to see (and laugh a little?)

OK, here I am in all of my 18-year-old dorky glory. Did you recognize me without the glasses? So that's what I'll be doing this weekend - dredging up old memories and seeing old friends. What will you be doing this weekend to make the most out of the last days of summer? Thanks for stopping by and don't forget to check out what the other blog hoppers have in store for you today!


Thursday, August 16, 2012

2012 Artisan Finalist Blog Hop - Day 8

Hello and welcome back to the Artisan Finalist blog hop for Day 8! Can you believe we're down to the last few projects? I know I can't! I've seen so much amazing stuff this week - and I've heard that the Artisan winners will be starting their blog hop shortly too so the inspiration will go on and on! If you just came from Connie's blog, thanks for hopping along! Wasn't her project beautiful?

For today I'm sharing another of my scrapbook pages (we had to make 3). This one was my digital page created with My Digital Studio using the Summer Smooches designer series paper that I {love!}. If you've been following my MDS blog hop posts you will probably know my stuff just isn't this busy. Ever. :) But I liked it when I was finished, so I went with it. Not sure if the business helped me or hurt me, but that's alright. I do love how it turned out.

I'll be back again in the morning with my post for the MDS blog hop, but until then hop on to the other ladies in the Artisan Finalist Hop below, your next stop will be the wonderfully talented Melissa Stout! Thank you so much for stopping by today. :)


1. Connie Collins
2. Holly VanDyne (you are here!)
3. Melissa Stout
4. Amy O'Neill
5. Sandie Connor
6. Amy Rogers
7. Mercedes Weber
8. Tara (Murphy) Bourgoin
9. Mindy Bingamon

Wednesday, August 15, 2012

2012 Artisan Finalist Blog Hop - Day 7

Welcome back to the 7th day of the Artisan Finalist blog hop! We may not have made the top 10 in the contest, but we gave it our best. You may have just come from Connie's blog, I'm sure she had something absolutely gorgeous to share with you today. I think she has magic hands. :)

Today I'm going to show you my favorite project. This was my other 3D project. I couldn't believe how many of the 20 finalists had done frames (Lots!) so here's my take on one. If I enter next year I'm going to have to step up the creativity a notch, I think!

I've had my eye on this frame at our local Hobby Lobby craft store for months and when I decided to enter, I skipped right on over there to get one. (Actually, I got 2 so I could make me one of these too since Stampin' Up! keeps the entries we send)

I used lots of different Designer Series paper on this one, don't you just LOVE the Mocha Morning paper for the tree trunks? So fun! I sewed the ruffled satin ribbon on the bottom of my girls' dresses with my sewing machine and added ribbon and strips of jewels to their dresses as well. Making this was just like playing with paper dolls! {love!} And see those clouds? It's the "muffin top" of the cupcake punch! I don't know about you (or maybe it's getting late and I'm just silly) but the word muffin top always makes me giggle. Even if you really are talking about a muffin!!! (hee hee)

Well, that's it today! If you are following the hop it's time to head on over to Melissa Stout's blog and see what crafty goodness she has for you today! And if you're not following in order (or are lost!) here is the complete blog hop list!


1. Connie Collins
2. Holly VanDyne (you are here!)
3. Melissa Stout
4. Amy O'Neill
5. Sandie Connor
6. Amy Rogers
7. Mercedes Weber
8. Tara (Murphy) Bourgoin
9. Mindy Bingamon


Tuesday, August 14, 2012

2012 Artisan Finalist Blog Hop - Day 6

Welcome back to Day (& project) #6 of our 2012 Artisan Finalist blog hop! All week we've been sharing the projects from our Artisan award entries and it's been so much fun to see what everyone created for it! Beautiful stuff - WOWZERS! Speaking of, you probably just came from Connie Collins' blog, didn't you? I just love all of her stuff!

Ready for another scrapbook page? This one was a 12x12 page that is hybrid. Meaning part of it was made digitally, and the other half was traditionally scrapbooked. I think it will be easier to tell you what's NOT digital on this page... The small flowers with the jewels in the middle over the photo, the pink journaling strips, and the middles of the large flowers. The large flowers themselves were digital, but the gray centers and everything on top of them are paper. The large "Nat" title on the picture and the stitching between the strips of Island Indigo paper were done digitally. I love digital a ton, but I'll never completely give up my paper. I just love it too much.

Thanks so much for stopping by my blog today! Be sure to continue on with the hop by visiting Melissa Stout's blog next - I know she'll have something very creative to share with you! See you tomorrow!

1. Connie Collins
2. Holly VanDyne (you are here!)
3. Melissa Stout
4. Amy O'Neill
5. Sandie Connor
6. Amy Rogers
7. Mercedes Weber
8. Tara (Murphy) Bourgoin
9. Mindy Bingamon

Monday, August 13, 2012

2012 Artisan Finalist Blog Hop - Day 5

Welcome back (or just plain welcome, if this is the first day of the hop you've seen!) I hope you had a wonderful Monday! And if you came from Connie's blog, I hope you enjoyed her Artisan project for today - how could you not? :)

When I started this hop I was going to do the projects in the order I created them, but I guess I'm not since this is the last card I made. I'm a last-minute girl and it was about 2am before I had to mail my entry. I was DRAGGING. I didn't think it would be possible to pull out one last card. So I decided to just use my favorites. I used pretty much all of them on this card! My favorite cardstock of all-time is Stampin' Up!'s Brushed Silver cardstock. It's just so pretty! And it looks fantastic heat embossed with our silver embossing powder. So that's what I did. And it looked pretty, but not pretty enough. The card was still pretty plain.

So I started coloring in some petals with my white Signo pen. I didn't want to do all of the petals, I was afraid that would take away the effect of the silver on silver, so I alternated rows of petals to color. Then on the other rows, I added bling... and more bling... and more bling! I think I probably used almost half of a pack of jewels. For the greeting I figured I should use something simple so my fancy flowers wouldn't overwhelm it, so that's why it's just a strip of white embossed with silver. And that was it!


That's all for me today! Time to head on over to Melissa Stout and see what beautiful work of art she has to share - yay! Thanks so much for stopping by!

1. Connie Collins
2. Holly VanDyne (you are here!)
3. Melissa Stout
4. Amy O'Neill
5. Sandie Connor
6. Amy Rogers
7. Mercedes Weber
8. Tara (Murphy) Bourgoin
9. Mindy Bingamon

Sunday, August 12, 2012

2012 Artisan Finalist Blog Hop - Day 4


Wow! I can't believe it's the fourth day of the blog hop already - where did the weekend go?

Did you just come from Connie's blog? Didn't you just LOVE her project? I really love her clean, yet amazingly beautiful style!

OK, it's about time I shared one of the scrapbook pages from my entry, don't you think? Mindy Bingamon and I were on the same wavelength with our scrapbooking pages. I also did an all digital page, a hybrid page and an all paper page.

So this is my completely 100% traditionally scrapbooked page. I am a "blue" girl, through and through. I love every shade I see but one of my favorites is Pacific Point. It's such a sharp, gorgeous color, isn't it? And I LOVE how it looks with black - so classy!

Since the Artisan entries had to be into SU! headquarters the last day of the old catalog we were allowed to use things are are now retired (but weren't then!) This is the Vintage Vogue stamp set that is now retired. For the stems of the flowers I just cut strips of the Old Olive polka dot designer series paper and made stems from them. The polka dots worked well with the black and white polka dotted ribbon under the pictures and my title.

OK, that's it for me today! Time to head on over to Melissa Stout and see what beautiful work of art she has to share - yay! Thanks so much for stopping by!


1. Connie Collins
2. Holly VanDyne (you are here!)
3. Melissa Stout
4. Amy O'Neill
5. Sandie Connor
6. Amy Rogers
7. Mercedes Weber
8. Tara (Murphy) Bourgoin
9. Mindy Bingamon

Saturday, August 11, 2012

2012 Artisan Finalist Blog Hop - Day 3

Time for Day 3 of our Artisan Finalist projects - are you enjoying the blog hop so far? I have seen SO many amazing projects from these ladies already and it's only been two days! I can't wait to see the rest of their projects.

Did you just come from Connie's blog? Wasn't her project gorgeous?

I think this was my favorite card in my Artisan entry. I wanted to include some of my favorite techniques in my entry and one of my very favorite things to do is to sew with my sewing machine. Not so much on fabric - on PAPER! :) And I sewed a bunch on this one. First I started with a long card, then added my First Edition designer series paper (with scalloped punched edges) to the card. Then I added three bunched rows of ribbon of different shades of green and sewed them all on with different stitching styles.

Then I two-step stamped and punched the petals and leaves also out of the First Edition designer series paper. And did you know the designer series paper curls really easily if you wrap it around a pencil? I added a few stacked dimensionals in the middle of each curled petal to make them 3-D. Then I added a brad in the middle of the flower. If you know me, you know I had to add a little bling to it, so I used some clear Dazzling Details on the inside yellow part of the flower petals, it's just a little hard to see it in the picture.

OK, time to go visit Melissa Stout (#3) and see what creative goodness she has to share with you today and thanks so much for stopping by my blog today!

1. Connie Collins
2. Holly VanDyne (you are here!)
3. Melissa Stout
4. Amy O'Neill
5. Sandie Connor
6. Amy Rogers
7. Mercedes Weber
8. Tara (Murphy) Bourgoin
9. Mindy Bingamon


Friday, August 10, 2012

2012 Artisan Finalists Blog Hop - Day 2


It's Day 2 with our Artisan contest entries! Maybe you just came over from Connie Collin's blog - let me tell you a quick little story about Connie. This past convention was my very first. I had two of my downline with me, but other than that I had never met anyone else in person (knew a few other demos from online). Connie was such a sweetheart and so friendly! No matter what class I was leaving, I always saw her friendly smiling face in the hallway - it was so comforting. So if you're reading this, THANK YOU, Connie!

So let's get on with my project for today. It may not be a big secret to some of you that I LOVE CLEAR! I LOVE Stampin' Up!'s window sheets! AND I love the new Sizzix purse die! Add these together and what do you get? This super-cute little clear purse!

Now here's the funny story to go with it. How you see it in this picture is how it was, packed and ready to go to Stampin' Up! with my contest entry. I had found the CUTEST little chocolate pearl-looking balls at our local chocolate store and they matched my purse so perfectly! But then on my way to the UPS store to mail it, I thought - "OH MY GOSH! What if the chocolate melts in my purse?" Melted chocolate would ruin it for sure! So I asked the UPS guy. "Will it melt?" and his response? "Probably." Well, crap. So I asked him for a bag, unpacked everything, took the super-cute chocolates out of the purse then packed everything back up again. Bummer. It was still cute without the chocolates, but it looked so much cuter with them (and much yummier!) And I'd be totally lying if I told you it never crossed my mind to sneak some of those chocolate balls to convention and put them into the purse on the display board! HA HA.

If you're wondering about the handle - I used the clear handle that got cut out with the purse, but adhered some bunched up ribbon to it and then sewed it onto the plastic (yes, you can use your sewing machine with window sheets!) :)

Thanks for stopping by - now head on over to the talented Melissa Stout's blog and see what Artisan goodness she has to show you today!

1. Connie Collins
2. Holly VanDyne (you are here!)
3. Melissa Stout
4. Amy O'Neill
5. Sandie Connor
6. Amy Rogers
7. Mercedes Weber
8. Tara (Murphy) Bourgoin
9. Mindy Bingamon

Be sure to stop back by tomorrow for our next Artisan Finalist project! :)

Thursday, August 9, 2012

2012 Artisan Finalists Blog Hop - Day 1

Welcome to my first post for the Artisan Finalists Blog Hop! Every year Stampin' Up! hosts their "Artisan" contest for demonstrators based on creativity and workmanship. This year they selected twenty finalists from those entries and from those twenty, ten were selected to be part of the new Artisan Design Team. While we are not the ones who were selected for the design team, we still thought it would be fun to give you a closer look at our projects. Each day for the next ten days, we will post pictures of our projects and more details on how they were created. Each entry had five cards, three scrapbook pages, and two 3-dimensional items, so no matter what your interests are, there should be something for everyone.

I struggled a bit on what order to post my creations, but decided to show them to you in the order they were created. This card was the first I made for my contest entry. Most of the time I make simple cards, I like to think this is one of them. Some of my other Artisan cards got a little crazy, but I liked how this one turned out even though it was simple. I used my favorite set - Elements of Style and some of my favorite colors, Very Vanilla, Pool Party and Soft Suede. I embossed the Pool Party strip with the Stripes embossing folder, then punched out the Soft Suede three times with the Curly Label punch, then embossed them with the Perfect Polka Dots embossing folder. I folded them over the embossed Pool Party strip to look like little pockets and added brads to hold them down.

Then I heat embossed the large swirly stamp from Elements of Style with white on a Soft Suede strip and adhered it above my "pockets". Then added a scallop punched border above it in Pool Party. I stamped the large swirl again in Soft Suede ink at the top and add some bitty flower punches layered with small circles, then finished them off with a small pearl. I added a "Thank You" stamped label (inked around the edges) and a strip of Pool Party ribbon at the bottom.

That's it for my "Day 1" project! If you just came here from Connie Collins' blog, wasn't her card to die for? That shape and the red with the black...LOVE IT! OK, now on with the blog hop for you - next you'll visit Melissa Stout who has an absolutely gorgeous scrapbook page to show you! The complete list of hoppers is here (all except for Mary Haugen who couldn't join us this time):

1. Connie Collins
2. Holly VanDyne (you are here!)
3. Melissa Stout
4. Amy O'Neill
5. Sandie Connor
6. Amy Rogers
7. Mercedes Weber
8. Tara (Murphy) Bourgoin
9. Mindy Bingamon

Be sure to stop back by tomorrow for our next Artisan Finalist projects! :) (And I'll have an MDS blog post for you in the morning as well!)

MDS Blog Hop - Holiday Mini Card

Yay for year 2 of the My Digital Studio Blog Hop! I'm SO excited to announce that we have a new blog hopper joining us! We are very honored to have the amazingly talented Kimberly VanDiepen join the MDS Blog Hop starting today - welcome Kimberly! :)

Today we were challenged to use something from the new Holiday Mini Catalog or to CASE something from it.

For today's project I wanted to use the Snow Festival Countdown to Digital Template which is available as a download. If you've seen the mini catalog they have the cutest paper chain made with this kit, but I wanted to do something a little different with it. So I combined this kit with the Winter Post digital stamp set and made a cute little card that would be great to hold a gift card or anything else you don't want someone to see until Christmas!

Don't forget to follow along with the hop! Just follow the digital yellow brick road to Kimberly's blog next and thank you so much for stopping by!

Wednesday, August 8, 2012

WOW! - 99 cent fabric SALE!

Stampin' Up! just added four sets of our discontinued designer series fabric to the clearance rack for only 99 CENTS! If you've ever wanted to try our fabric, now is the perfect opportunity!

These can only be ordered online in the clearance rack - just click on the links below to order!

Monday, August 6, 2012

My Digital Studio Convention Swap Card

I did four different swap cards for convention. This is the last one I still needed to share. I wasn't sure how this one was going to go over. Some demonstrators haven't embraced My Digital Studio yet and I was afraid people would turn me down when I tried to swap for this one. But if you think about it, isn't it still a great business tool to show digital samples for those of your customers who might love it?

When swapping, I offered one of my paper swaps and this one and let them choose. Boy, was I surprised! I ran out of this card before I ran out of my paper cards (and I made more of this one!)

Now, this is a hybrid card which means it was designed in My Digital Studio, then printed out, mounted on a cardstock back, then I added a real Stampin' Up! jewel to the top right corner of the heart.

I designed a card a few months ago with this stamp but I wanted to use it again because I just love it so much. I hope you have a wonderful Monday! I'm busy getting ready for a workshop and the Holiday Open House on Sunday - busy, busy, busy! (But it's all good!)

Saturday, August 4, 2012

Holiday Open House


You're invited to a Stampin' Up! Holiday Open House on Sunday, August 12th from 2:00 - 4:00 pm. Be sure to stop by for:

  • Pick up your NEW Holiday Mini Catalog
  • Make a Halloween and a Christmas project to take home with you
  • Look through hundreds of card samples for inspiration (may want to bring your camera!)
  • Information on upcoming classes
  • Munch on some yummy treats
  • Be eligible to win some fun prizes

I only ask that you RSVP by posting a comment to this post, the Facebook event page here, or email me at holly@hollystamps.com so I know how many make n' take projects to prepare!

Not local but still want in on the fun?
Any online orders of over $25 made through my online store on Sunday will be eligible for the Open House prize drawings AND I will mail you the completed make n' take projects! It's as close to being here as you can get!

Hope to see you (or hear from you!) soon!