Sunday, July 27, 2014

My Last Post...

This will be my last post on Create Something Everyday...

I have a brand spankin' NEW blog and a brand spankin' NEW project to go with it! Check out the blog for my new monthly Paper Pumpkin kit night (http://hollystamps.com/paper-pumpkin-sale/) AND my new Pumpkin Project (http://hollystamps.com/the-pumpkin-project/) that will give you instructions on making super-cute Project Life cards out of your Paper Pumpkin kit supplies every month!

Every post and comment that was here is now there. I'll keep this site up for any Pinterest and past blog hop links, but if you want to see new content please visit my new blog by clicking on the image below.


Thursday, July 24, 2014

MDS Blog Hop - Hello My Name is Goofball

It's that time again!
Time for the My Digital Studio blog hop. And I'm SO excited that we're welcoming a new member to the hop this week - the mega talented Wendy Weixler! I can't wait to see what MDS goodness she shares with us each hop.

This is the hop where we share what we've been working on in MDS. I've been knee deep in wedding photos this week and thought I'd scrapbook one of my favorites. These kids are so awesome and have so much fun wherever we go - this photo is so them. I love it!

I also love the "Playground" Project Life digital kit. As it's name says, everything in the kit is fun and playful. Perfect for my photo.

I've been working on some big changes for this blog and hope to begin to implement them starting next week, so be sure to check back soon!

Now head on over to Jeanna's fabulous blog by clicking the image below and check out what amazing creation she has to share with you today!


Thursday, July 10, 2014

MDS Blog Hop - Looking for Sea Glass

Yay! It's that time again - time for the My Digital Studio blog hop where our theme for this week is "Summer Fun".

I've been on a simple kick lately. And I'm a firm believer that when you love your pictures you don't need a whole lot of "stuff" to overshadow them.

So here's my simple page of our day of summer fun. The only thing I used in MDS is a strip of cardstock and a font (Century Gothic).

Thanks so much for stopping by!
Time to visit the next blog on the hop where I'm sure Jeanna has something amazing to share with you!


Thursday, June 26, 2014

MDS Blog Hop - For the Love of the Game

YAY! It's MDS Blog Hop day!
Sorry about the short but sweet post today - my agent sent me revision notes for my latest book so I've got to dive in head first (if I don't come back out of the writing cave in a week or two, please send someone in to find me!)

For the blog hop today we're supposed to share what we're working on (as far as MDS) but I took it a little more literally and MDS'd what I'm working on this week.

I love. love. love. the Downtown Grunge kit. Even after years, it's still my go-to kit for so many projects.

Well, I'm off to take on these edits and whip this book into shape so I'll see you again when I get out - hopefully I'll have a super-shiny new book safely tucked under my arm.

Now head on over and check out my friend Jeanna's fabulous MDS project! I'm sure you won't be disappointed!


Sunday, June 22, 2014

Work of Art Envelope

Time for another envelope!

On this one I used the Work of Art stamp set for the watercolor-like "swooshes" under the name and the return address stamp, and also for the heart. The watercolor look uses Soft Sky ink and the 'Grandma' and the address stamp are stamped with Island Indigo. The heart is Strawberry Slush.

I love doing envelopes like this. Seriously, it took me ten minutes tops to stamp the elements and it makes the piece of mail you're sending so much more fun and interesting - don't you think?

Now here's a fun little tip that I always teach when we do lettering in art class. An easy way to center lettering (like I did with Grandma) so that you're not trying to squish the end few letters in because you didn't leave enough space is to write out the word like I did on the right. Then figure out what the middle (or middle two) letter is. If you need to number them to figure that out, go for it. Once you know your middle letter (mine was N), stamp that letter first! Then work your way out on both sides from there starting with either the A or the D.

Thanks for stopping by and I hope you're having a wonderful weekend!


Saturday, June 21, 2014

Envelopes Can Be Fun, Too!

I've been having so much fun with envelopes lately, thanks to a great group of stampin' ladies who love to make matching envelopes with the cards we make each month. I thought I'd share a few envelope ideas with you today (and I have one tomorrow, too!)

Not sure I've mentioned on the blog yet how much I'm in love with the Positively Chevron stamp. So. In. Love. Good Golly. It's hard not to want to use it on everything!

You know what I love about background stamps? They also look great on envelopes! All you need is a blank label or two to put over the stamped design (for your addresses). On this one I also used the .05 size Project Life journaling pen to do some doodling around the labels to help them stand out a little more. The stamp was just slightly shorter on the one side and left a small white space on the side so I used the new rotary alphabet stamp and stamped SPECIAL DELIVERY down the side to fill the space.

Thanks for stopping by and be sure to come back again tomorrow for another fun envelope idea!

Thursday, June 12, 2014

MDS Blog Hop - Dad Selfie

I love my dad!
He's always doing something funny or goofy to make me laugh. We had a birthday party for my youngest daughter last weekend and when I put my camera card in my computer to download the photos from the party, this selfie was on it. Of my dad! Hilarious! He didn't know he was giving me ammunition for my MDS Blog Hop Father's Day page! (thanks, Dad!)

This is such a super fast page, here are the few supplies you'll need:

Background Paper
Downtown Grunge

Embellishments
This & That Retro Fresh
Staple & Stitching
Gold Sequins

Be sure to keep following the hop, next you'll see what project the fabulous Jeanna has in store for you! Just click the 'next' button below!


Thursday, May 22, 2014

MDS Blog Hop - Love Page

This week for the MDS Blog Hop we're sharing what we've been working on. It's the end of the school year so I'm doing everything EXCEPT for MDS. (Unfortunately!) But I did come up with this quick, simple page to share with you today. My friend, Abby is getting married this summer and I have a lot of wonderful engagement photos I took of her with her (future) hubby, Zac.

Here's my supply list!

Background
Designer Series Paper - Glimmer - silver

Embellishments
Neon Notes - flower 3
Staple & Stitching - Staple
This Makes Me Happy - flag
This Makes Me Happy - pool party and dots
Nobody's Business - white frame
Blossom Builders Rhinestones - 7mm Blushing Bride

Stamps
Everything Eleanor
Moments Ago


Be sure to keep following the hop, next you'll see what project the fabulous Jeanna has in store for you! Just click the 'next' button below!


Thursday, May 8, 2014

MDS Blog Hop : *heart* This Page w/ Project Life

Welcome back to another week of the My Digital Studio blog hop where we share some fun digital projects. This week we're working on projects about Mothers. This theme is near and dear to my heart for two huge reasons. There is no doubt in my mind that God put me on this Earth to be a Mother to these two amazing little girls. I take this job very seriously and hope I'm doing alright with it. They (and their daddy) are definitely the loves of my life.

I'm LOVING playing with the new digital versions on the Project Life Everyday Adventure kit from Stampin' Up! and wanted to try the cards in a non-pocket page way. The hexagons at the bottom and the top of the picture are just the 2x3 cards blown up big and turned on their sides.

This was a super-fast and easy page to make, just add a few cards, some stitching and the heart this stamp.

Be sure to keep following the hop, next you'll see what project the fabulous Jeanna has in store for you! Just click the 'next' button below!


Friday, May 2, 2014

Super-Easy Digital Handwriting

I've had a few people ask me lately how I added my signature to my watermark and to my blog posts. Technically I use a digital drawing pad instead of a mouse with my laptop and that's how I made it. BUT since then I've found a super quick and easy way for you to make your own which doesn't involve you spending $100 on a drawing pad. In fact, it won't cost you anything if you have a tablet.

If you have an iPad, I use an app called "Paper" by FiftyThree . It lets you draw with your fingertips (not your nail - don't want to scratch that screen!). Here's the fun part. The more pressure you put on the screen with your finger, the thicker your line will be. The less pressure, the thinner. And it's so easy to use! It gives you different "albums" to use and there are many pages in each to play around with. Don't like what you made? Use the eraser tool to erase it! There are many colors, too. As you can see, I used it to write the word 'Love' for the card in my daughter's album. Once you have the app there are other more complex tools you can order but I've been using for a while and I've never had to purchase anything.

See that little box with an arrow button in the middle of the X and the + at the bottom of the screen? That's the button you press to share your creation when you get it just how you want it. That share button will let you email it to yourself. With this one I just emailed it to myself then uploaded it to my favorite photo processor.

Now I have a neuromuscular disease that makes my fingers and hands tremble so normally my handwriting isn't the best. It's kind of shaky and not very smooth. But see the 'Love'? I did that! Even with my shaky fingers! It takes whatever you write and makes it SMOOTH. Awesome, right?

But what if you have an Android tablet? Unfortunately, Paper by 53 isn't available for Android, however I have heard of a similar app called Bamboo Paper that IS available for free in the Play store and iTunes. I tested this app out, too and it works a LOT like Paper by 53. Only this one lets you pick your pen size and has more colors available (and cuter ones!). But as far as writing goes, I found the Paper by 53 App slightly easier to get the look I wanted. Either way - there are two fabulous free options that will let you get your own handwriting digitally into your scrapbooks or on your blog!

I've had a few people ask -- the Project Life card used on my page above is from the Stampin' Up! Everyday Adventure kit and you can get one by clicking here. Just go to PRODUCTS at the top, then SHOP NOW and all of the Project Life items are on the left side. :)

Hope you have fun!


Tuesday, April 29, 2014

A Simple Work of Art

I am such a sucker for fast, flat, simple cards! So guess what I have to share with you today? I used to have a feature on the blog called "Flat Tuesdays" where I'd share a completely flat card with you. Well, it IS Tuesday...

A few of my team members and I went to the Stampin' Up! 2014/15 Catalog Premier last night and got to get our own copy of it. We also got one of the BRAND NEW stamp sets called "Work of Art" and it is one of my new absolute favorite sets (even before I knew we were going to bring one home!)

It's got a little watercolor-y action going on and has greetings AND the background images. Everything stamped on this card is in the set. The background "swoosh" is stamped in Pistachio Pudding and the words on top are stamped in Baked Brown Sugar. The heart is stamped in Strawberry Slush. I used my spritzer tool and a Soft Suede Stampin' Write marker to spray some brown on it. Then I rounded the corners with the new Project Life corner rounder.

I love how quick and easy this card is - five minutes TOPS!
You'll be able to order from the new catalog on June 1st, if you'd like to get your hands on one before then just email me at holly@hollystamps.com and I'll get one to you.

Saturday, April 26, 2014

Audrey Title Page - Project Life by Stampin' Up!

I've mentioned in previous posts that in 2013 I did a Project Life album for each of my girls and took a photo every day. I'm almost finished with the albums (all of the photos are in there, I just have to finish my journaling). But one thing I didn't have finished was the title pages. For some reason I was having a complete mental block on how to do them. I had photos of her in each season which didn't all match and that was making it harder for me to come up with something.

When my Everyday Adventure kit from Project Life by Stampin' Up! came this week, I knew I had the perfect design for my title pages - FINALLY! The colors were broad enough that it took the various colors of all of my photos and tied them all together. Yay! Here's what my final title page for Audrey's page looks like. And I was SO happy - the Day to Day stamp set had all of the season names that I needed to go with my pictures.

If you're wondering about the title card with her name and the date, I created them in My Digital Studio and did an earlier blog post about those here.

If you are new to Project Life and pocket scrapbooking, and are wondering about the size of a yearly album like I did you can see how thick my finished 365 day album is in the photo on the right. And the best thing is that the album closes flat with even a little room to spare for embellishments (I didn't use many in this album).

Don't forget - Thursday is the day to order the first batch of Project Life by Stampin' Up! goodies, so be sure to check back here on Thursday, May 1st for ordering details!

Project Life by Stampin' Up!


My Project Life by Stampin' Up! arrived a few days ago and Stampin' Up! relaxed their policy on when we can show items in pre-order so I thought I'd take some photos of what they look like and give you all a little sneak peek today!

If you are already a Stampin' Up! demo you can pre-order the goodies NOW, or if you're not a demo you can sign up as one (contact your current SU! demo for more information - or if you don't have one yet, feel free to ask me any questions you may have by emailing me at holly@hollystamps.com) OR you can begin ordering your very own kit as a customer through any Stampin' Up! demonstrator on Thursday, MAY 1st!

I have lots of photos here, if you want to see one bigger, just click on it! :)

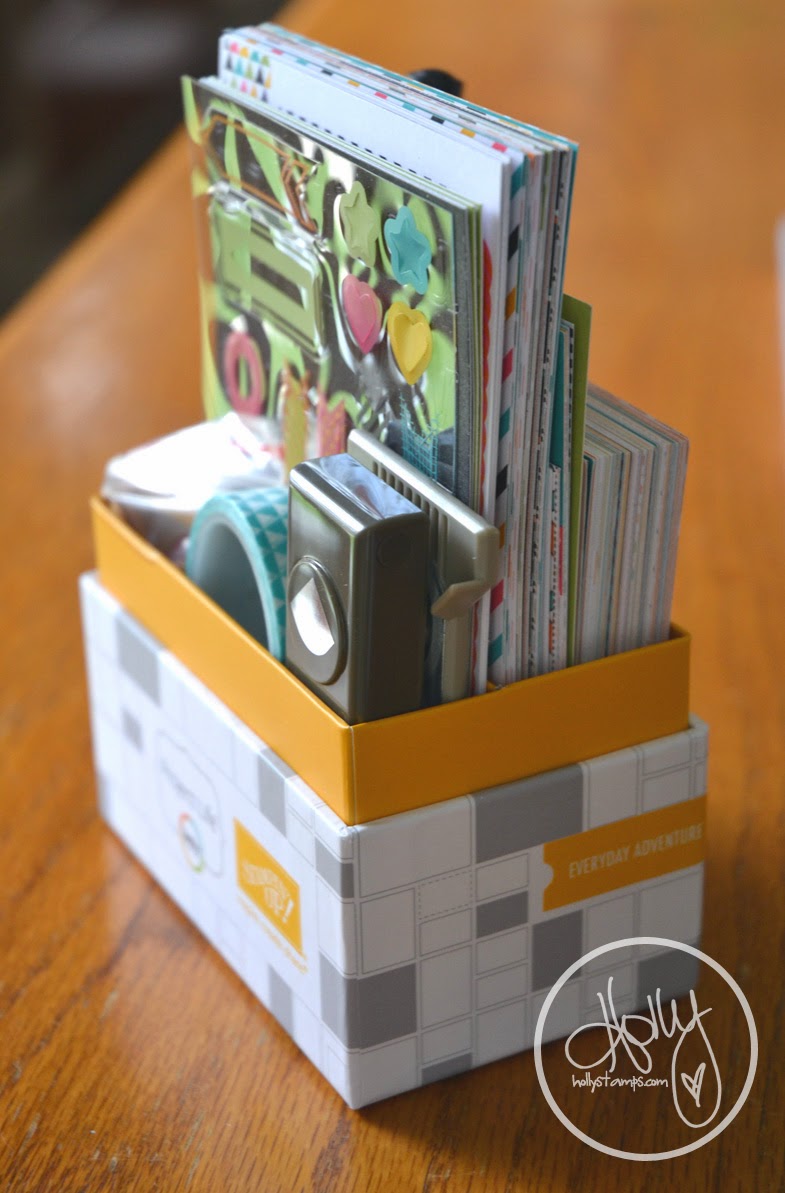
First, let me just tell you that while I adore everything this kit came with, I LOVE the little box it comes in! It will hold your entire kit, accessories, pens, photos, etc. in one little box right there! As someone who does a lot of my scrapbooking at crops where I travel, this will come in SO handy! I can plan out each page and keep them in the box.

Next I ordered the accessory pack but had no idea what was inside. First, there are these super-cute little sticker letters in both black and green. Sticker alpha's are my favorite so I was VERY excited to see these!

 Next there were 4 different die-cut 3" x 4" cards! They are all cute, but this one is my favorite.
You also get a sheet of these cute little clear plastic accessories. LOVE the banners and arrows!
Cardstock stickers! Four sheets of them.
I can't wait to use these!
Then there are wood cuts and arrow clips. How cute are these?
Here's a picture of the entire accessory pack. Notice there is also a roll of washi tape (in my favorite color!) AND cute circle puffy stickers! My love of puffy stickers dates back to the 80's, but I digress...
And here's the backside of the Everyday Adventures box with the core kit, the accessory pack goodies, my pens AND the corner rounder - they all fit so nicely!

And see that little yellow label around the side of the box? It comes as a sheet of stickers (in many languages) that allow you to put on your box to keep them all straight. This kit is SO cute, I can't wait to see what other Project Life kits will be available in the new catalog! If you want a catalog, feel free to contact me for one when they come out!


This first stamp set is the "Day to Day" Project Life stamp set. It's much bigger than I thought it would be. I laid them out on an 8 1/2" x 11" piece of cardstock so you could see how big they actually are. As a daily/weekly PL'er I'm in LOVE with this set.

This Project Life stamp set is the "Point & Click" set. I love all of the elements and it looks like some of the labels coordinate with the Framelit dies. Yippee!


Thursday, April 24, 2014

MDS Blog Hop - Black is the New Black

Hello and welcome to the blog for another MDS Blog Hop day! Today we're showing what we've been working on and for me, it's scrapbooking!

There's nothing I love more than classic black and white. I love how it can take a seemingly normal photo and make it really stand out.

I wanted to keep this page simple and keep it blacks, grays and whites. Easy, right? Except for that flower that looked absolutely beautiful in yellow, right? I just popped it on my page, hit the recolor button and chose black instead. And look how fabulous it looks now! I love how easy and fun the recolor feature is - it may be one of my favorites in MDS!

Now head on over to Jeanna's blog by hitting the "next" button below - I don't know about you, but I can't wait to see what she's been working on this week!


Wednesday, April 23, 2014

Project Life by Stampin' Up! - Splash Harbor Page

YAY!
My Project Life by Stampin' Up! pre-order arrived today via the big brown truck and I couldn't wait to play. Here's just a little sneak peek of a page I did with the products.

I had these great spring break photos that I've been excited to scrapbook and the colors were perfect for the Everyday Adventure kit that arrived today.

I have to say - I LOVE the new 4" x 4" pockets. They're such a fun size to use.

Even though the new Stampin' Up! annual catalog comes out June 1st, you'll be able to order this Project Life kit and its goodies on May 1st! I'll post order links on the blog on that day!


Friday, April 18, 2014

My Favorite Current Stampin' Up! Products for Project Life

If you've been regular reader of my blog then you know I've been using Project Life for the past two years to do my scrapbooking. So you can imagine how excited I was to hear that Stampin' Up! would have exclusive Project Life products coming out soon.

Since the products haven't been released yet, I thought I'd share some of my favorite current Stampin' Up! products that I love using in my Project Life albums. These are products that you can get your hands on right now! (and a few of them are from the Occasions mini catalog that is only available for one more month)

Last year I did a daily Project Life album for each of my girls. While I loved it, it took a LOT of work and time. So this year I thought I'd do a weekly album for each of them.

Here are a few cards from my first week of 2014. Can you tell we had a ton of snow? I love the Retro Fresh washi tape (Occasions mini catalog) from the This and That line. I also used the This and That Rotary Date Stamp on my Week 1 title card.

Stampin' Up! has so many fantastic stamp sets that also work well with scrapbooking. One of my new favorites is the Just Sayin' set (Occasions mini catalog) with some adorable speech bubbles that make fun captions on your photos. I popped the "woo hoo!" bubble up with a dimensional to give it a little more dimension. For my "Week 1" card I used both the Notable Alphabet (week) and the Memorable Moments (1) sets. With two girls I don't have a lot of pages without bling so I added a strip from the Basic rhinestones.

What I love most about Project Life is that it allows you to make fast and simple pages, but they still are so fun to create and don't take a ton of time to do it.

Tuesday, April 15, 2014

Stampin' Up! & Project Life!

It's official...
I have died and gone to heaven.
Why?
Stampin' Up! just announced that they have partnered with Becky Higgins and Project Life to offer EXCLUSIVE items and kits with Stampin' Up!'s colors.

And the best part? Some of the items will be available to order on May 1st!

I hope you are as excited as I am! Demonstrators get a pre-order so keep watching this blog and I'll have some fun sneak peek projects to share with you as soon as my box arrives!


Thursday, April 10, 2014

MDS Blog Hop - Spring!

Yay! It's MDS Blog Hop day again! This week we are sharing projects that have to do with a Spring or an Easter theme.

The project I'm sharing today was featured on the My Digital Studio blog a few days ago, but we've been having so much with this Lego play mat since I made it that I thought I'd share it for my project today. My girls are always big "spring break planners" and always have a full schedule for me, but they also love helping me make things that we can play with and this was perfect for this!

I started with an 8" x 10" canvas and filled the background with Watercolor Wonder DSP (the green chevron pattern makes some really fun grass!). The curvy road is just a capital S punch blown up pretty big and colored black. Then I used a re-sized Daffodil Delight rectangle punch for the lines on the road. I printed it out, laminated it and my girls got to work filling it up with Lego's and playing! There are so many options you can make with this project (use some blue and make a pond or lake for your Lego scuba divers!). Make a few and adhere them together!

I'm sure the rest of the blog hoppers have some beautiful and fun projects for the hop today, including the talented Miss Jeanna who is next in the hop! Just click the 'next' button below to travel to the next project and thank you so much for stopping by!


Thursday, March 27, 2014

MDS Blog Hop - Miss You Already Page

Thanks for joining me for the blog hop this week! I'm sorry, this is going to be a short post for me today.

This week one of the most amazing women I've ever known, my Aunt Joan, passed away. To say I'm heartbroken would be an understatement. She meant so much to me and I'll miss her so much. I already do. She always knew what to do and say and always had a smile on her face even when her health wasn't the best. I am so blessed to have had her in my life.

So my quick page using the Blossoms Abound kit is of my Aunt Joan with her nieces and nephews a few Easters ago. She loved us all so much and we loved her right back.

Now hop on over to Jeanna's blog to see what she's been working on this week - just click the next button below!